Sunday, October 14, 2012

Chocolate Pistachio Biscotti with Sarah


Fall Break! The four days of abandoning all productivity on work-related matters has allowed me to 1) finish knitting a pair of sox, 2) start knitting a sweater, and 3) have enough energy to document baking something for the blog. Now if only I could have a four day weekend every week, I would probably be a much more pleasant person to be around! Wouldn't we all...

In lieu of the usual chocolate chip cookies or brownies for the kids, or some sort of fruit based dessert for Kieran and I, I tried to compromise. The kids like chocolate. The kids like pistachios. I like biscotti. Kieran likes whatever I bake as long as it contains no bananas or pumpkin. So after a few cruises through my copious pile of cookbooks, I arrived at chocolate pistachio biscotti! Since the kids have also been off of school for the last four days and my daughter was going a bit crazy with boredom (partially the result of rejecting any idea for fun out-of-the-house activities we had offered for the last four days), Sarah decided to help me.
Here she is, mixing the dry ingredients.
The recipe is modified from the book Martha Stewart's Cookies. Actually, it wouldn't have been modified at all if I had been cooking by myself and hadn't been distracted from recipe reading by a half-broken egg dribbling down the side of the mixing bowl and on to the mixer and counter, the result of Sarah's attempt to break the eggs into the butter and sugar for me...

Chocolate Pistachio Biscotti
2 cups all-purpose flour
1/2 cup cocoa powder--I use a combination of regular and dutch process (unsweetened) 
1 teaspoon baking soda
1/4 teaspoon salt
6 tablespoons butter
1 cup sugar
2 large eggs
3/4 cup shelled pistachios, roughly chopped.
3/4 cup semi-sweet chocolate chips
2 tablespoons heavy cream

1. Preheat oven to 350 F. Line a baking sheet with parchment paper.

2. Shell the pistachios until you have about 3/4 cup. The pistachios I used were the regular salted type easily found in the grocery store. You could probably by pre-shelled, but I find that they don't taste as fresh. Roughly chop the pistachios.

3. Whisk together flour, cocoa powder, baking soda and salt into a bowl. Using an electric stand mixer, cream together the butter and sugar until light and fluffy. Add the eggs, one at a time, and mix until incorporated. Add flour mixture a bit at a time until mixed, then finally add the pistachios. Mix until just combined.

4. Form the dough, which will be quite stiff, into a 12" x 4" or so log on the parchment paper. Bake for about 30 minutes. At this point, the dough will be hard on the outside, but still quite soft on the inside. Turn the oven down to 300 degrees. Let the dough cool for about 5-10 minutes, then carefully transfer to a cutting board. Cut on the diagonal with a sharp serrated knife into 12-15 pieces, about 3/4" thick.

5. Place the slices back on the baking sheet and bake for another 10-12 minutes, this time at 300 degrees. When done, place on a cooling rack and let cool for at least 30 minutes.

6. (optional) To dip one end in chocolate, melt chocolate chips and cream together, stirring until smooth. Dip one end of each biscotti into the chocolate, then lay on plastic wrap sprayed with a bit of cooking spray or spread with soft butter. Let cool until chocolate has solidified. Store in an airtight container.

Shelled pistachios. As you can see, at least some
of them made it into the bowl instead of my stomach.
Eggs! Just because I like the photo.
Sarah adds them into the creamed butter and sugar.
In go the dry ingredients!
The dough ready for the first baking.
Out of the oven and onto the cutting board!
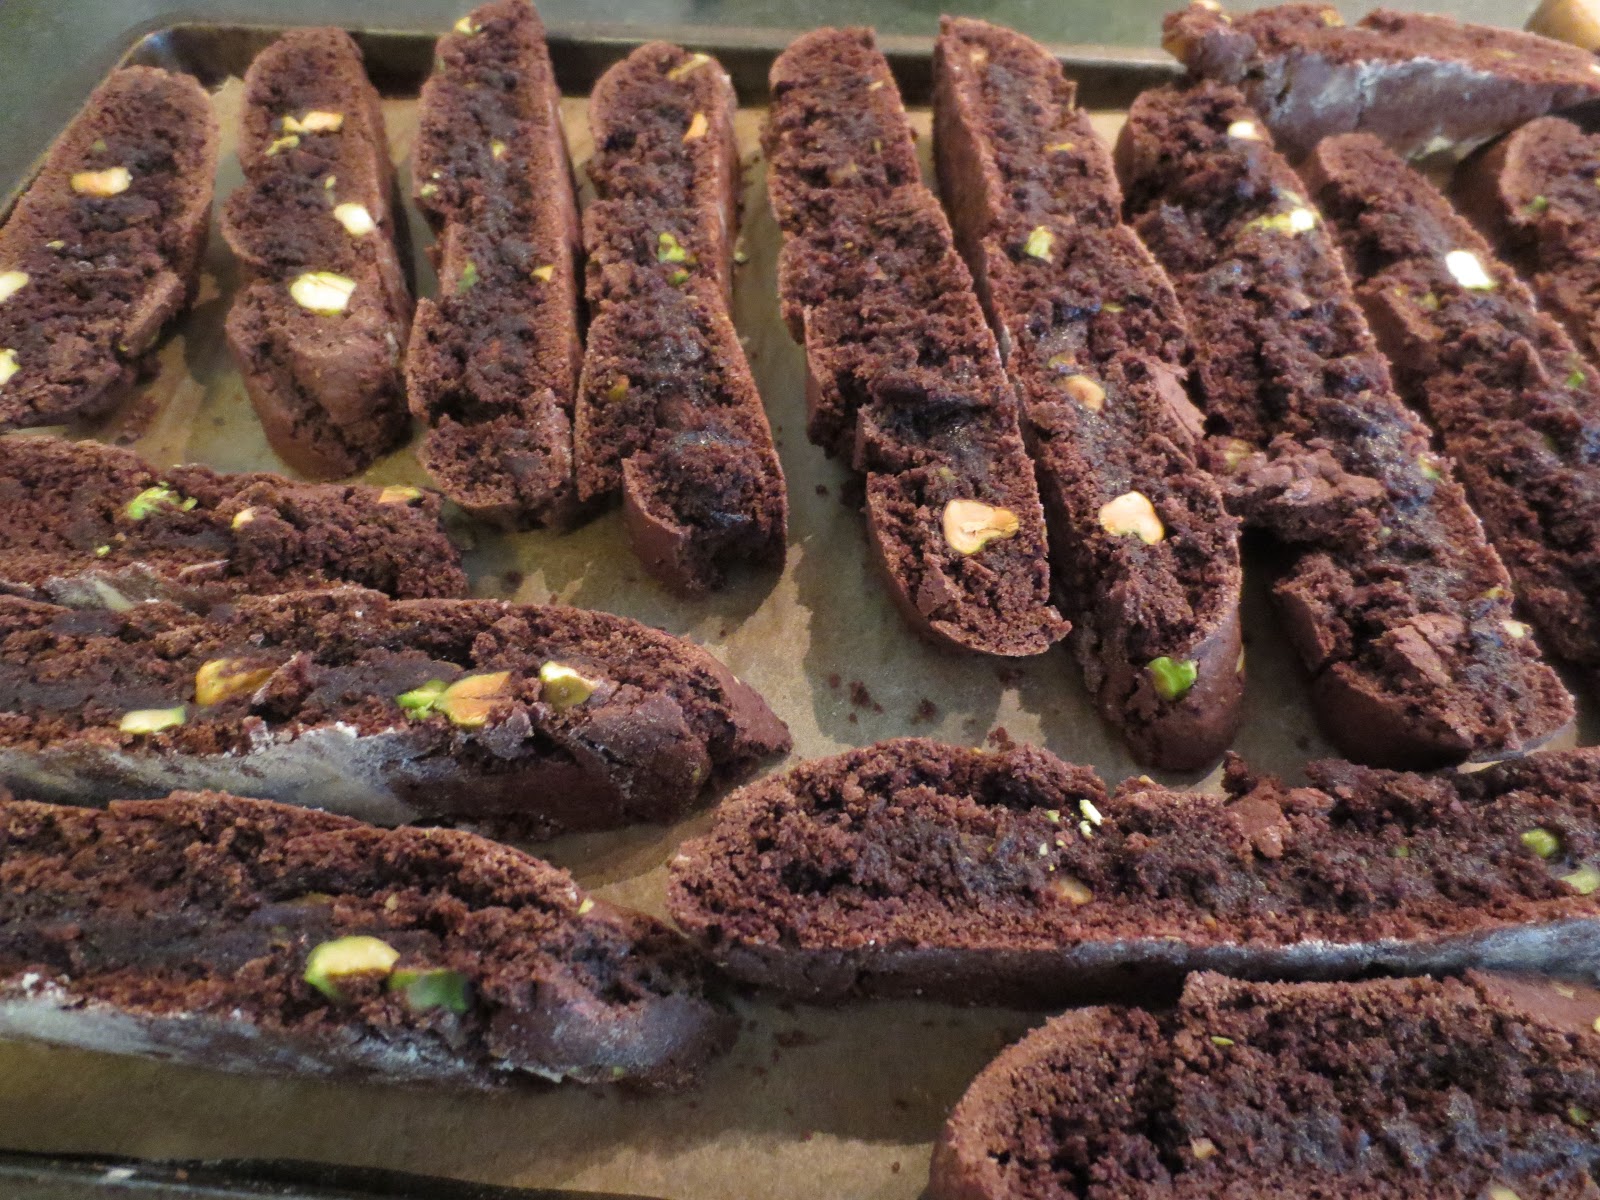
Cut into slices and ready for the second bake.
Ready to heat the chocolate and cream.
And dipped in the chocolate and ready to eat. Thanks to my
cousin Sheila for being on top of my Facebook posts and suggesting
that we dip the biscotti in chocolate!
In the original recipe, one adds 1/2 cup of chocolate chips into the dough, which would probably work just fine if, you know, you like to actually follow recipes to the letter. But where's the fun in that?


Sunday, September 16, 2012

Apple Crisp and Cooking Therapy


It's been a rough couple of weeks. I've taken some pictures off and on for the last two weeks, but haven't had the time (or energy) to post anything. Today you get a recipe (Apple Crisp) and then some pictures of things I made but didn't write about. Just because I don't want to waste the pictures. But cooking is good therapy when I'm under too much stress, so I have actually been doing some cooking--which in my case seems to usually mean baking!

About two weeks ago, the first of the new apples started to show up in the grocery store. For the last two weeks it was Galas, which are nice eating apples but not ones I normally cook with. Today, to my surprise, the first Honeycrisp apples showed up! Usually we don't see those for another couple of weeks. Honeycrisp apples are absolutely delicious, but only make a relatively brief appearance in the fall. They are so good eaten fresh that I don't know why anyone would bother to cook them! I plan on reheating some caramel I made a while ago, slicing some up, and dipping away. But today I made a standard in honor of the new apples and the first few really cool days we've had since last, um, let me see, March? So far back I can't remember exactly. The temperature will be headed back up to 90 this coming week, but I'm enjoying the cooler air while I can!

I basically improvised the following recipe--but once you've made apple crisp a few times, so could you. The principle is simple--slice up some apples and combine them with sugar and spices (and maybe some flour or cornstarch to thicken the juices), then top with something crispy crumbly and bake until the apples are soft and the top is browned. There you have it--apple crisp. There are a million recipes out there. I happen to like my crisp with oats in the topping.

Apple Crisp
Filling
3ish pounds of good baking apples, peeled and sliced (I use Granny Smith because I like things a little tart)
2 heaping tablespoons of flour
1 teaspoon cinnamon
1/8 teaspoon nutmeg, freshly grated if possible
juice of 1 small lemon
1/2 cup sugar
1 pinch salt

Topping
1/2 cup almond meal (or toasted almonds ground quite fine)
1/2 cup old fashioned rolled oats
2 tablespoons granulated sugar
1/4 cup packed brown sugar
1/2 teaspoon cinnamon
1/8 teaspoon nutmeg, freshly grated if possible
1/8 teaspoon salt
5 tablespoons butter, melted and cooled

2 tablespoons cold butter, cut into small pieces

   Preheat oven to 425 F. Peel and slice the apples into slices about 1/4 to 1/3 inch thick, although it's really up to you and how big you like your apple pieces. Combine with the flour, cinnamon, nutmeg, lemon juice, sugar and salt. Mix well and set aside.
   For topping, measure almond meal, oats, granulated sugar, brown sugar, cinnamon, nutmeg and salt; stir until well combined. Add melted butter and mix thoroughly.
   Grease a 9" x 13" baking pan and spread the apple filling. Dot with cold butter, then scatter the topping over the apples. Bake for about 30 minutes, or until apples reach desired doneness and topping has browned. You could also bake for longer at a lower temperature if you prefer--I just happened to have the oven at 425 because I was also baking a loaf of bread.
  Cool slightly, then serve in bowls with vanilla ice cream.

Slicing the apples
Combining apples with sugar, flour and spices
Topping ingredients, ready to mix
In the pan with the butter...
...and the topping.

Out of the oven and ready to eat!
Now, as promised, are some pictures of some other things I've cooked over the last two week. If you want the recipes, let me know and I'll pass them along!
Crepes with Nutella
Banana Chocolate Chip Bread
White Sandwich Bread (America's Test Kitchen recipe)
No knead multigrain bread--posted in May
Challah--although Rosh Hashanah starts tonight, and I'm given
to understand that the new year's loaf should be round, not braided.


Saturday, September 1, 2012

A Lemon Tart that Kicks Butt

Ok, I know that's an unusual title for a blog post, but this is really good lemon tart. It's one I've made many times over the last 20 years or so. It is one of the few things I make which I think is better than what I might get in a restaurant or a bakery. The lemon tart is fairly... tart. I don't like super-sweet lemon desserts, so this really appeals to my palate.

It's really a fairly simple dessert. It's a sweetened crust filled with lemon curd. The lemon curd is made from scratch and seems tricky at first, but really the only tricky part is determining when the curd has thickened sufficiently to start adding the butter. You just have to keep a close eye on it while you're stirring.

I got the recipe out of a cookbook that I bought when I was an undergraduate students. It's from sort of a strange series from the "California Culinary Academy" and was published by, of all things, Ortho Books, a division of Chevron Chemical Company. Really? A series of cookbooks from the folks that brought you gasoline, Round-Up weed killer and Miracle Gro? I also can't remember where I got the book. Bookstore? Hardware store? Gas station? The California Culinary Academy is apparently a real place--a for-profit cooking school in San Francisco--one which recently lost a multimillion dollar lawsuit brought by students by allegedly charging huge amounts of tuition and lying about job placement success rate afterward. Oops.

No matter, it's a really tasty tart. The recipe I use here is adapted from Easy and Elegant Meals: Cakes and Pastries, 1985 from Ortho Books.

Sweet Tart Pastry-- Pate sucrée
For a 10 inch scalloped tart band
or a 10- by 2-inch tart tin
1 1/2 cups flour
1/4 teaspoon salt
1/3 cup sugar
3 large egg yolks
1/2 teaspoon vanilla extract
1/2 cup cold butter

Mix together flour, salt and sugar. Cut in the 1/2 cup butter with a pastry cutter until it is well distributed through the dry ingredients. In a small bowl, mix egg yolks and vanilla extract together until just combined. Mix the egg yolk mixture into the butter and dry ingredients and toss until well combined. Bring the dough together and form into a flat disk. Refrigerate for at least an hour. Remove dough from refrigerator, pound it out then roll out into a large disk--rolling it out between two large sheets of plastic wrap will make it easier to transfer to the tart pan. Take off top layer of plastic wrap and gently transfer dough disk into the tart pan. This type of dough tears easily, but is also very easy to patch. Your first go at getting it in the pan will be something of a mess. Just take the extra dough and press it down to patch tears or fill in holes. In fact, if you really wanted to, you could skip the rolling and just press the dough into the pan. Once the dough is in the pan with the excess trimmed, put the tart pan into the refrigerator for at least 30 minutes to let the dough firm back up before blind baking the crust.

To blind bake the crust, preheat the oven to 400 F. Prick a fork all around the dough to keep the crust from bubbling. Line the tart with aluminum foil or parchment paper, and fill with dried beans, aluminum weights, or a cake pan slightly smaller than the tart pan. Bake about 15 minutes until crust is mostly set. Remove the aluminum foil and beans (or whatever you used). Bake the pastry shell another 10 to 15 minutes until golden brown. Remove from the oven an let cool completely before filling with the lemon curd.

Butter cut into flour/sugar mixture, tossed with the egg yolks.
You can see how it will need to be coaxed into a ball.
It took a little pressing and persuading, but here's the dough disk.
After you take it out of the refrigerator, give it some good whacks
with the rolling pin to flatten before rolling.
Rolled out pastry dough
First attempt at getting it into the tart pan.
But see? It's fixable! 
Blind baking, part I.
The finished tart shell! See, that wasn't so bad. A bit
finicky, but doable.

Lemon Curd
3 whole eggs
3 egg yolks
1 cup sugar
2/3 cup freshly squeezed lemon juice
1 teaspoon finely grated lemon zest (lemon rind, just the yellow part)
1/2 cup butter, cut into pieces and softened (left to come to room temperature)

In a stainless steel bowl, combine eggs, yolks, sugar, lemon juice and lemon zest. Place the bowl over a pot of boiling water and whisk over medium heat (stirring constantly) until the mixture thickens to about the consistency of mayonnaise--about 5 to 10 minutes. Don't let it go much beyond that point, especially not to boiling, or you'll end up with curdled (i.e. scrambled) eggs. The mixture will start to foam as it warms, and will be quite foamy and slightly lighter in color around the time it thickens. Thickening seems to take forever, but once you notice it beginning to thicken things will move along quickly. Remove from heat and quickly whisk in the butter a piece at a time. Once all the butter is incorporated, pour the still-warm curd into the pastry shell and let it come to room temperature. The curd, fully thickened when you pour it,  will quickly set as it cools. If it remains liquid-y after 5 minutes, you didn't cook it enough.

Strain the lemon juice before using. No one likes lemon
pips in their tart. Well, I don't, anyway.
Everything but the butter!
Over the boiling water and beginning to foam.
Thickened and ready to mix in the butter. The foam has been
incorporated into the curd and the whole think has lightened.
After the butter and into the tart shell. Not fancy, but
oh so good. Have fun licking the bowl that the
lemon curd was in. This is one time I save the bowl for
myself rather than letting the kids have it.
And you're done! I suppose you could gussy it up with some cooked meringue, some fruit, or whipped cream, but I usually serve it plain. I own a 10-inch tart pan, but you could probably use a large pie plate if that were all you had. Don't be scared of making the lemon curd--if the mixture does curdle on you, it doesn't take long to whip up another batch and try again. Try not to eat so much of the warm curd that you don't have enough for the tart!

Thursday, August 30, 2012

Corn Chowder! Something to do with fresh corn...

Of course the best way to eat fresh sweet corn is to pick it, boil or roast it, slather it with butter and some salt, then eat it. Messily. With butter dripping down your chin. I grew up in southern lower Michigan, where a lot of farmers grow corn. Mainly dent corn, I presume, but sweet corn as well. There used to be a farm stand near my house when I was a kid (the same space now hosts a McDonalds and a strip mall) and the sweet corn was fresh and wonderful when it was in season. I've now lived in Oklahoma for 18 (!) years, and finding really good sweet corn around here can be a challenge. It's not really corn-growing country. If you're looking for okra, jalapeños, melons or tomatoes, we've got you covered. But sweet corn? Not so much.

So, with the corn in the grocery store looking anemic, possibly due to the drought in the corn belt, I thought I'd buy some and make some corn chowder. There's probably dozens and dozens of recipes out there (a quick internet search verified that), but really the basics come down to: corn, bacon, potatoes, onions, and milk. You can add flour as a thickener, or purée some of the chowder and add it back in. You can add celery, red or green peppers, chicken or vegetable broth. You can season with thyme, tarragon, basil, or just salt and pepper. You can use russets, or Yukon golds, or plain white potatoes. You can make it thick or thin. You can toss cheese or bacon bits on top of your bowl of chowder. I don't typically use a recipe when I make it (the same is true of a lot of soups), but I tried to keep track of what I did so that I could record it here.

I find that I often don't use a recipe when I cook. When I bake, yes, I tend to follow a recipe (although I often modify it as I go along), but when I cook I only tend to use a recipe when I make something completely new to me. I presume a lot of people who like to cook are like that, but I don't know. How about you?

Here's some corn chowder for a warm dinner.

Corn Chowder

5 ears sweet corn
2 large russet potatoes (or whatever you prefer)
1 large onion, chopped
2 cloves garlic, minced
5 oz (about 5 slices) bacon, cut into small pieces
2 heaping tablespoons of flour
1 teaspoon thyme (I like thyme, but it is fine to add less)
2 cups whole milk
1 cup heavy cream
3 cups chicken broth
2 teaspoons salt (more or less to taste)
1 teaspoon ground pepper

   Cut the corn off the cobs. I used to do this by holding the cob upright and cutting down until I saw a Sara Moulton cooking show where a visiting chef left the corn longways on the cutting board and just slicing off the corn that way. Less messy, I think. But you can get the corn off the cob any way you'd like. I prepared the rest of the ingredients before beginning to cook.
   Use a largish pot. Fry the bacon over moderate heat until crisp. Remove bacon bits from the pot and set aside. Cook the onion until translucent (softened). Add the garlic and sauté a few minutes. Add the flour and cook until the fat is absorbed by the flour. I like my chowder on the thin side, so the 2 tablespoons of flour will only provide minimal thickening for that much liquid. If you like your chowder thicker, you can add more flour, but you will need to add more fat as well--about 1 tablespoon flour per tablespoon of butter or oil. Alternatively, you can take about 1/2 of the completed soup and purée in a blender, then pour back into the pot. The corn and potatoes which have been puréed will thicken the soup.
Everything chopped and ready to go!
Frying the bacon (mmmmm... bacon....)

Adding flour to the onions, garlic and bacon fat
(mmmmmm... bacon... oh wait, I already said that)

Cooking the raw ingredients in the chicken broth

   When the flour has absorbed the fat, slowly begin to add the chicken broth, stirring constantly until the flour paste is fully dissolved into the liquid. Add the corn, potatoes and thyme, then cook for 20-30 minutes until the potatoes are the consistency you prefer. Add the milk, cream salt and pepper then heat through. Don't let the soup come to a hard boil after adding the cream--that messes up the consistency of the soup. Finally, add the cooked bacon back in OR save to sprinkle on top of your bowl of soup. Chives are also a nice touch if you have them.

Ready to eat! I should have had some saltines ready...


Sunday, August 19, 2012

Stout Bread with Spinach, Onions & Gouda

Time to bake some bread! I realize that I have been posting quite a number of sweet dishes, so I decided to give a go at something more savory.

The two inspirations for this bread are "Spinach Cheese Boule with Whole Wheat" from the blog "The Fresh Loaf" by  Dolf Starreveld. You can find that recipe here: http://www.thefreshloaf.com/node/3111/spinach-cheese-boule-whole-wheat. The other inspiration, which I followed enough to say that this recipe is adapted from, is "Dark Sour Bread" from Bernard Clayton's New Complete Book of Breads (1987, Simon and Schuster). Bernard Clayton first published The Complete Book of Breads in 1973, and the recipes in his book really were written before the artisanal bread movement began in the late 1980s. These are standard make-in-one-day loaves with fairly soft crusts which aren't baked on a baking stone or started with a poolish (overnight starter). As such the recipes are tasty, but one should not expect the crust that one gets with artisanal bread or no-knead bread.

Stout Bread with Spinach, Onions & Gouda
5 oz organic baby spinach, roughly chopped
1 small onion, in a small dice
1 T olive oil
4 oz (1/4 lb.) Double Cream Gouda, cut into 1/2" cubes

1 bottle (12 oz) stout
3/4 cup water
2/3 cup stone-ground cornmeal
2 T butter
2 tsp salt
1/2 cup molasses
4 1/2 tsp dry yeast (2 packets)
2 cups whole wheat flour
2 cups bread flour, up to 1/2 cup more for kneading, depending on wetness of dough.

Sauté the onions in the olive oil until softened and beginning to brown. Add spinach, and cook until the spinach has completely wilted. Set aside to cool.

In a saucepan bring the stout and water to a simmer. Take off heat, then stir in cornmeal, butter, salt and molasses. When cooled to warm but not hot, add the yeast and 2 cups of whole wheat flour. Stir until blended. Add about 1 1/2 cups of the bread flour, and stir until you have a thick, shaggy mass. Turn out  onto countertop and begin to knead, adding in the last 1/2 cup of flour. Sprinkle more flour as you knead for about 10 minutes, The dough will be heavy and fairly wet. After about 10 minutes, gradually knead in the spinach and onion mixture, then the gouda. Kneading this together can be a little tricky, but you can add as much bread flour as needed to make the dough workable--or you can squeeze the spinach mixture after wrapping in a cheesecloth to get rid of as much moisture as possible.

Once the spinach, onions and cheese are thoroughly incorporated, form the dough into a ball. Place into an oiled or buttered large bowl and cover with plastic wrap. Let rise until double, about 1 1/2 to 2 hours. Once dough has risen, punch down and divide in two. Form each half into an elongated loaf and place in oiled bread pans; cover with plastic wrap. Let rise again until double, about 1 hour. About 20 minutes before the bread will go in the oven, preheat the oven to 375. Bake the loaves for 40 minutes, or until done. Turn out of pans immediately and let cool.
*******************
The bread has a moist crumb, and some nice flavor. I find the bread to taste slightly sweet, and the onions are a nice complement. If I were to do the recipe again, I would probably try a no-knead method  and a higher temperature (and no loaf pans) for a better crust.

As a point of reference, here's some documentation of the process.
The onions after browning
And in goes the chopped spinach...
Which gets cooked down to this.
Here's the yummy double-cream gouda!
The wet stuff after cooking, but before adding the flour.
The little dots are the stone-ground cornmeal.
Here's the dough all kneaded and ready for the first rise.
After 1 1/2 hours, the dough has doubled in volume.
The dough after being divided and allowed to rise in the loaf pans
ready for the oven!
The finished bread! Allow to cool for at least 30 minutes until you
try to cut into it, otherwise you'll end up with odd bread mush.