Saturday, July 28, 2012

Nectarine Golden Cake, the Day the Air-Conditioner Broke


So I went on vacation up to Lake Michigan, as my family does each year. Aside from a day and a half that were a bit warm, the weather was beautiful--highs in the 70s to about 80. This is good because the house we rent has no air conditioning. I did a lot of cooking on the trip--I generally cook most breakfasts and dinners for a household of eight people, sometimes more. The cooking, however, is rather workaday. I just make sure every gets fed a hot meal. 


Back in Oklahoma now, where it was 107 today and expected to go higher over the next several days. I decided to do something with some nectarines which I had in the refrigerator. I've never cooked with nectarines, but it seemed a summery thing to do. After perusing various recipes, I settled on "Nectarine Golden Cake" from Epicurious. For those of you unfamiliar with the site, it's a repository of recipes from Gourmet magazine (now defunct--I'm still angry about that) and Bon Appétit, as well as a few other places. The recipes are generally quite reliable, but there's also a reader review system which provides extra information. You can find the recipe at:
http://www.epicurious.com/recipes/food/views/Nectarine-Golden-Cake-354960


I followed the recipe exactly, with the exception of baking it an extra 10 minutes because I could find my 8" springform pan, but not my 9" inch springform pan, which the recipe calls for. 


Nectarine Golden Cake


  • 1 cup all-purpose flour
  • 2 teaspoons baking powder
  • Rounded 1/4 teaspoon salt
  • 1 stick unsalted butter, softened
  • 3/4 cup plus 1/2 tablespoon sugar, divided
  • 2 large eggs
  • 1 teaspoon pure vanilla extract
  • 1/8 teaspoon pure almond extract
  • 2 nectarines, pitted and cut into 1/2-inch-thick wedges
  • 1/2 teaspoon grated nutmeg


  • Equipment: a 9-inch springform pan


Preheat oven to 350°F with rack in middle. Lightly butter springform pan.
Whisk together flour, baking powder, and salt.
Beat butter and 3/4 cup sugar with an electric mixer until pale and fluffy. Add eggs 1 at a time, beating well after each addition, then beat in extracts. At low speed, mix in flour mixture until just combined.
Spread batter evenly in pan, then scatter nectarines over top. Stir together nutmeg and remaining 1/2 tablespoon sugar and sprinkle over top. Bake until cake is golden-brown and top is firm but tender when lightly touched (cake will rise over fruit), 45 to 50 minutes. Cool in pan 10 minutes. Remove side of pan and cool to warm.


So, the picture at the top of the page there are the lovely nectarines, sliced into 1/2" thick wedges. The cake batter was pretty standard. When I had made it up, I dumped it in the oiled springform pan.

I spread it around then began to lay the nectarines in. 


The recipe says "scatter the nectarines," but I though what the heck, and arranged them in a pattern.
If you look closely, you can see the sugar and nutmeg sprinkled over the top. Did I mention that I used freshly grated nutmeg? It's really simple to grate and has a much brighter taste than the pre-ground stuff. 
I baked it for 50 minutes, but the center was still not completely cooked, probably because I used an 8" rather than 9" pan. I baked it a further 10-12 minutes, until a knife inserted in the center came out clean. And here it is!
Now here's the funny, or at least ironic bit. I chose a nectarine dessert because it was a hot day. While I was baking it, our air-conditioning went out and the hot oven heated up the kitchen quite effectively. As I write, it's 86 degrees in the house and we're waiting for the repair guys to show up. 


I can happily report, however, that this is one tasty cake, even when it is way too hot out! Yum. Maybe I'll give some to the repair guys.


Wednesday, July 11, 2012

Who Taught Me to Cook, part III

Well, since it's been too hot to cook plus husband is out of town and kids don't actually like regular mom-cooked dinners all that much, I haven't cooked much exciting in the last week. Made some zucchini fries and battered carrots--that was kind of new--in an effort to elicit more enthusiasm for vegetables from the offspring, but no luck. Overdid the dessert making last week, so that's on hiatus. And, quite frankly, I don't have an abundant repertoire of hot weather dishes which don't require turning on the oven or standing over the stove or grill. So voilà, here I am, postless.

Time to continue the saga of how I learned to cook. See May posts if you haven't read the first two. If you've read the first two, you know that while I don't come from a long line of fancy cooks, I did grow up in an environment where I was exposed to people and cuisine from many different parts of the world. This helped turn me into a somewhat more adventurous eater than what I ate at home would suggest, and helped to somewhat mitigate my picky tendencies (and I do have them!). I still really didn't care for vegetables, though, and my range of fruits was still pretty narrow.

When I was a young adult (senior year in high school through my undergraduate degree), I was to meet someone who greatly improved my understanding of how to cook. I was hired, at first, as a dishwasher in a medical research lab at the University of Michigan Medical School. In the lab was a research associate named Dr. Oksana Lockridge. She took me under her wing, and began to teach me how to do actual lab work. Eventually she hired me as a lab assistant and finally promoted me to research assistant. She was an incredible mentor to me, and even though I didn't go on in the sciences after my undergraduate degree, her intelligence, kindness and work ethic continue to influence me to this day. The salary I earned also put me through college and enabled me to be declared an independent student in the eyes of the financial aid office.

Aside from all she taught me in the lab, she also helped teach me to cook. She was (and I imagine still is) a fantastic cook. She told me that anyone who was good in the lab could also cook--the two processes were largely the same. If I could successfully follow the guidelines for carrying out an experiment, I could read a recipe and follow it. Since she had taught me how to be a reasonably decent lab assistant, I believed her that I could probably cook.

Oksana sometimes tried new recipes herself, but she also had an innate sense of how to cook without a recipe. Occasionally I was invited over for Sunday brunch (as well as other meals), and was always astonished that she made crepes by simply tossing eggs, milk, flour, butter and a little salt and sugar together, without measurements, adjusting until the mixture was the right consistency. Then she churned out the beautiful crepes, which she served with sour cream and jam. She taught me how to make them.

Everything she made was delicious. I credit her with teaching me how to cook vegetables so that I would find them edible. She would often stir-fry them until they were hot but still a little crunchy. And they tasted good! And I could duplicate them myself! She showed me how to read a recipe all the way through before I started cooking, so that I would be prepared for all the steps. She showed me how to use my knife more effectively, and to prepare ingredients in the proper way for the recipe I had chosen.

She couldn't, of course, teach me all she knew about cooking, but she taught me some good techniques. She taught me what a confident cook looks like, and she gave me confidence that I could read and follow a recipe, as well as begin to get a sense for how to cook without one. I am still grateful to her for all she taught me, and I still make those crepes at least once a month for my own family.

Thursday, July 5, 2012

Strawberry Shortcake

The last couple of days, I've been reading a book called Hometown Appetites: The Store of Clementine Paddleford, the Forgotten Food Writer Who Chronicled How America Ate, by Kelly Alexander and Cynthia Harris (2008, Gotham Books). Paddleford's career spanned from the 20s through the 60s, and she wrote about food for many newspapers and magazines, most notably the New York Herald Tribune. The book is, happily, supplemented with some recipes from her long career as a journalist. One of the first was a recipe for "Jennie Paddleford's Strawberry Shortcake," her mother's recipe that she ate growing up. It is probably from the late 1800s and can be found on page 17.

For July 4, what better dessert to make than strawberry shortcake? I was curious about the recipe, although I adapted it to what I had available. It is a recipe for a large single strawberry shortcake. The shortcake itself is more like a sweet biscuit than anything else. It's not a sponge cake--its much more dense and slightly dry.

Strawberry Shortcake, adapted from "Jennie Paddleford's Strawberry Shortcake"

3 cups all-purpose flour
5 teaspoons baking powder
1/8 teaspoon fresh ground nutmeg
1 teaspoon salt
1/2 cup sugar
11 tablespoons butter, cut into small pieces
1 egg, beaten
1/2 cup whole milk

at least 1 quart strawberries, more if you have them
about 3 tablespoons sugar/quart of strawberries, more or less to taste

1 cup heavy whipping cream
2 heaping teaspoons confectioners sugar--more or less to taste

Mix together flour, baking powder, freshly ground nutmeg, salt, and sugar. Cut the butter into the flour mixture with a pastry cutter or two knives, as you would for making a pie crus. Mix the milk and egg, then make a well in the middle of the dry ingredients and mix together with a fork. The mixture will not come together completely--turn it out onto a floured counter and knead briefly until the dough comes together. Don't overwork the dough. Cut dough in half, roll out into a 9" circle for two circles. Place the dough into two 9 inch cake pans then refrigerate for at least 30 minutes. While they are chilling, preheat the oven to 400 degrees. Bake about 15-17 minutes until the shortcakes begin to brown and have cooked through. Turn out onto cooling racks and let cool to room temperature.

To prepare strawberries, hull them and cut into halves or fourths. Sprinkle with sugar, then let them macerate for 15 to 30 minutes in the refrigerator.

Meanwhile, make the whipped cream. In a mixing bowl, mix the cream and confectioners sugar. Using a hand mixer, whip until the cream is firm and begins to look a little dry. Don't over mix or you'll end up with butter!

Assemble the shortcake by putting whipped cream and about half the strawberries on one shortcake. Top with the second shortcake and add the rest of the whipped cream and strawberries. If not eating right away, store in the refrigerator.

So, here's the play by play:
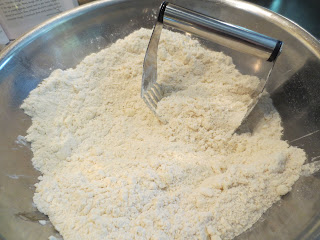
Fresh ground nutmeg! Buying whole nutmeg and grating it gives you incredibly fresh and fragrant spice! I use a microplane grater, but you could use a box grater or even the little graters that are sometimes sold with whole nutmeg. Tough to measure out exactly 1/8 teaspoon unless you grate onto some parchment paper and then measure, but I usually just eyeball it.
Cutting in butter is easier if you start with relatively small pieces. You want to mix it in so that you get something that looks kind of like clumpy cornmeal. Small individual pieces of butter visible is fine, but large chunks are not. You could also do this part in the food processor, but I like to do it by hand for no other reason than I like to do it by hand.
So, once you've got it mixed up the way you want it, it's time to add the milk and beaten egg.
And here we are after I've mixed it, then turned it out onto the counter and kneaded it a bit until it all came together.
I cut it in half and rolled out my first 9" circle. Actually, I probably rolled out an 11" circle then had to fold parts over to pat into the cake pan. Oops. Did better with the second one!
Into the cake pans...
...then into the oven to bake. Here they are, all done and cooling off. Yes, I also made chocolate cookies for the kids.
Now, on to assembly. First layer...
...then whipped cream and the second layer and more whipped cream. Ta da!

Overall, I like the recipe, although if I had it to do over I would use more strawberries. The shortcakes are not sweet and spongy, like one would get at the grocery store, but they do have their own special charm. The original recipe calls for buttering the shortcakes when they come out of the oven, and serving them warm with strawberries, with a pitch of cream on the side to pour over individual portions, should you want to try it the original way.

Sunday, July 1, 2012

Cooking my Bookshelves: Key Lime Pie, without the Keys

Ok, I figured after being home for a week and a half, it was time to haul out a cookbook and make something new. I actually completed my first pulled pork (a two day and many hour project) but failed to take any pictures or actually record the recipe, which was an amalgam  of helpful suggestions of friends on Facebook and recipes I found online. Next time, I'll track it and pass it along.

Today I went for a dessert. Husband loves Key Lime Pie, and I've never made it. So I decided to give it a shot. I had been perusing one of my cookbooks that I haven't actually made anything out of over the weekend-- Saveur The New Comfort Food: Home Cooking from Around the World, edited by James Oseland. Strangely, I can't find a date on the thing, but it is fairly recent, and published by Chronicle Books.

Here's the recipe, as written (p. 211):

Key Lime Pie
1 cup plus 2 1/2 tbsp. graham cracker crumbs
1/3 cup sugar
5 tbsp unsalted butter
1 1/2 tbsp. lime zest (from two limes)
3 egg yolks
1 14-oz. can sweetened condensed milk
2/3 cup fresh lime juice, preferably from Key limes
1 cup heavy cream, chilled
1 tbsp. confectioners sugar

Serves 8

1. Heat oven to 350 F. Pulse cracker crumbs, sugar, and butter in a food processor to combine. Press evenly into bottom and sides of a 9-inche pie pan. Bake until lightly browned, about 10 minutes.
2. In a medium bowl, beat lime zest and egg yolks with a hand mixer until pale and thick, about 5 minutes. Add milk and beat until thickened, 3-4 minutes more. Add lime juice; mix until smooth. Pour filling into pie crust; bake until filling is just set in the middle, 8-10 minutes. Let the pie cool.
3. In a medium bowl, whisk cream and confectioners' sugar to stiff peaks. Spread whipped cream over the top of the pie and chill 2-3 hours before serving.

I more or less followed the recipe, with a few minor changes. First, I didn't have any key limes. If they appear in the grocery store at all in Oklahoma, it's for about two weeks in the late winter or early spring. I didn't want to use bottled juice, because it's not as bright. So, I used regular Persian limes. First, I zested them.

Then, since I only had four, I hoped like hell that I would have enough for 2/3 cup of juice. I squeezed away using a citrus reamer until...
Hot dog! Just about exactly 2/3 cup. Whew! Now that I knew that I had enough lime juice, I proceeded with the crust. Luckily we usually have graham crackers. I guessed at how much I would need (most of one packet) and buzzed it up in a blender. Why a blender rather than doing the who thing in a food processor, as instructed? Because disassembling the food processor and cleaning it is a pain in the butt. The blender is easer. I measured out the crumbs and it came out exactly right. Score! I then mixed in the sugar and melted butter by hand until everything was well mixed. The fun part is pressing it into a pie plate.
I baked it for the suggested 10 minutes and set it aside to cool.

Next, I worked on the filling. I mixed three egg yolks with the lime zest then beat with a hand mixture until it was thickened and pale yellow, about 5 minutes.
I then beat in the sweetened condensed milk for a few minutes, and finally stirred in the lime juice. Filling done, I poured it into the pie shell.
I baked it for about 10 minutes, until the middle was just set. I let the pie cool to room temperature. Now, at this point what I did NOT do was  make the whipped cream and put it on the pie before chilling. Why? While I prefer fresh whipped cream, my kids like the stuff that you squirt out of the can, which we happened to have. So, I tossed the cooled pie in the refrigerator for about an hour and a half. Here's the result!

The result? It's not quite as tart or lime-y as it would have been using key limes, but it was still quite good. Slightly sweet for my tastes, but husband really liked it, which was the intention in the first place. The kids? "Yuck, we don't like limes." Turns out I could have made fresh whipped cream after all.