This morning, I stumbled upon an article in the New York Times entitled "New York Plans to Ban Sale of Big Sizes of Sugary Drinks." The gist of the story is that Mayor Bloomberg has proposed a ban on the sale of sugary drinks over 16 oz. in restaurants, fast food places, and movie theaters. Larger sizes would still be available in grocery and convenience stores. Sugary drinks include any drink with added sugar--soft drinks, sweetened tea and coffee, fruit juices which are less than 70% juice. The ban would not prohibit an individual from buying more than one serving, but cup and bottle sizes could not be greater than 16 oz. The ban would not include artificially sweetened drinks, or water.
It's been interesting reading the comments to this article, which are about what you might expect. There's the "no nanny state" contingent versus the "Americans are too darn fat and have no sense of personal responsibility" contingent. On a side note, it does always amaze me how much a certain segment of the population seems to viscerally loathe fat people, seeing them as lazy, morally bankrupt leaches on society who have no right to breathe the same air as fit people. I've never really gotten that--it is perfectly legitimate to be alarmed by the rates of obesity in this country, to look at the increased health care costs as a real social problem and to advocate for good nutrition and exercise. But the level of vitriol one sees in public comments on obesity is just downright scary. Maybe this alarms me because I am a fat person myself, and quite frankly I don't really think I am morally bankrupt and free from self-control. But I digress.
I have been doing a lot of reading lately in preparation for my IFDS seminar in Italy http://www.ciee.org/ifds/seminars/italy/index.aspx. I'm just now making my way through one of three books by Carlo Petrini, the founder of the Slow Food movement. The Slow Food movement was begun more or less in reaction to American style fast food making its way into Europe in the 1980s. It has developed into an entire network of people with multiple aims: sustainable agriculture, the preservation of biodiversity, fair prices for small farmers, seasonal and local cuisines, taking the time to enjoy the sensory pleasure of eating and socializing among other goals. I occasionally find myself irritated by the somewhat elitist tone of the writing--how the hell is someone of limited means in an inner-city urban area going to be able to afford organic local produce--and taken back by the naiveté of thinking that a network of small farmers being able to take on agribusiness, but overall I do think that the movement is laudable and important.
Ideally, food should be real. It shouldn't be crap, like so much fast food is. It should have some real nutritional value. It would be great if small farmers could actually make a decent living growing a variety of fruits and vegetables. I would love to eat meat which came from animals who had a reasonably peaceful and humane existence, even if I don't love paying the steeper prices. I am not, however, altogether against fast food in limited doses. Let's face it--if you eat meat, a Big Mac tastes good. Even the French think McDonald's does a pretty great job on their fries. And God help me, I love pop. I always have. I love the way it tastes. I love the bubbles. I love drinking something sweet. I hate coffee, so I love getting the caffeine in a way that tastes good. I can't stand the taste of aspartame, Splenda, and other artificial sweeteners. If I only had a glass of Dr. Pepper every two or three weeks, that would be fine. But for me, that's hard to do.
Which brings us back Mayor Bloomberg. Many of us undoubtedly consume too much sugar, whether it by HFCS or cane sugar. It's absolutely a problem among children as well, since so much sugary processed food and drinks are easily available to them, and the consumption of sugar is partly responsible for the increase in childhood obesity and type II diabetes. I agree that the sizes of soft drinks have been increasing alarmingly over the last two decades. Who actually needs 44 oz. of soda? But is it reasonable or fair to artificially limit what people can buy? Will that fact that someone will need to buy two servings to get 32 oz. of Coke mean that people will start drinking less coke? I don't have a firm opinion about this. In principle, this kind of regulation might be worthwhile in terms of public health. However, it also strikes me as a ridiculous thing to legislate. Really? I can't buy a 20 oz drink to go with my lunch if the vendor is willing to sell it and I'm willing to buy it? It makes far more sense to me to just put a higher tax on anything with a high sugar content, although apparently Bloomberg proposed this and the Feds said no.
I suppose I've nothing to add to the conversation that far brighter people than me haven't already said, but it does make one think. What is the role of government in the food sector, beyond ensuring that what we eat isn't actually tainted of poisonous? Did government cause the ready availability and cheapness of sugary drinks in the first place through farm subsidies for corn crops (resulting in the availability of dirt cheap High Fructose Corn Syrup as a sweetener)? If the government is going to regulate our sugar consumption, should it be at the production end, by ending the subsidies that benefit agribusiness rather than small farmers? Seems like it would be cheaper, and the resulting increase in the cost of sugary drinks may end up curbing consumption.
Thursday, May 31, 2012
Monday, May 28, 2012
Family Recipe: Brown Soda Bread

A few days ago, I put out a call on Facebook for relatives to send me recipes or food stories. The first person to respond was a cousin who lives in Cork, Ireland--where my Dad's family comes from. Tony Clifford is my Dad's first cousin on his father's side. Fearless when it comes to computers, Tony is a great guy who is very active in keeping in touch with us all on Facebook and by e-mail. I've seen him a couple of times in Cork, and at least once over here in the States--he's got nephews in the Tulsa area. I also can't believe how much he travels! Tony was kind enough to send me a number of recipes, which will be featured here over the course of the summer.
I thought I'd start with a classic which would probably be of interest to my relatives here in the States--Brown Soda Bread. First, let me post the recipe as he sent it:
Soda
Bread Brown (or white)
1 lb white flour
1 lb brown flour (or white if you want a white loaf – total of 2 lbs)
1 cup oatmeal (porridge oats)
1 teaspoonful of bread soda
1 cup of bran – optional
Pinch of salt
One and a half pints of buttermilk
3 oz butter or margarine or a combination of the two
1 oz of sugar – brown or white
Mix flour, salt, bread soda. Add sugar and blend in butter/margarine
Add buttermilk and mix thoroughly. Knead well on a board.
Cut in small loafs/cakes – about 6 suits us
Place on baking tin. Brush on some buttermilk.
Bake in hot oven e.g. 425F or 190C
Enjoy.!
I've noticed from the other recipes he send me (and from reading older cookbooks from the UK) is that in some recipes, the older English units are used (rather than metric). However, as is typical of recipes from Europe, many of the measurements are by weight, rather than volume. Americans tend to use recipes written for volume (cups, both liquid and dry), rather than weight. Many American cooks don't own a scale because it's usually not necessary when following American recipes. I do, however, own a scale--it's really useful, especially when using European recipes.

So, in the interest of making the recipe more familiar to my American relatives, I've converted everything to typically American units. Please note that I am ashamed to say that I had to look up how many cups are in a pint!
2 3/4 cups all-purpose flour (I used all-purpose as opposed to bread flour since this isn't a yeast bread)
2 3/4 cups whole wheat flour (not whole wheat graham flour, which contains more bran)
1 cup old fashioned oats (not the instant kind)
1 teaspoon baking soda
(I omitted the bran--I only had oat bran on hand, and I assume the recipe calls for wheat bran)
1/4 teaspoon salt
3 cups buttermilk
6 tablespoons butter
2 tablespoons granulated sugar
A word about the oats--the old-fashioned oats (rolled oats) that I used may not have been exactly what the recipe was written for. Steel-cut oats are very common in Ireland and are sometimes referred to as porridge oats (or Irish oats in the U.S.). The rolled oats are what I had on hand, which would be typical of an American household. Old-fashioned oats are steamed then rolled out, steel-cut oats are oat groats which are cut into small pieces. I'll try this again with steel-cut oats sometime and let you know how much of a difference there is. Don't use instant oatmeal, which normally contains a lot of sugar and wouldn't provide much texture.

And a word about the brown flour--as far as I can tell, brown flour is roughly the equivalent of U.S. whole wheat flour. The equivalent of U.S. whole wheat graham flour would probably be wholemeal flour in Ireland/UK. So I used plain whole wheat flour.

I followed the rest of the recipe more or less as written.
 |
| After mixing the dry ingredients and cutting in the butter, I added the buttermilk. |
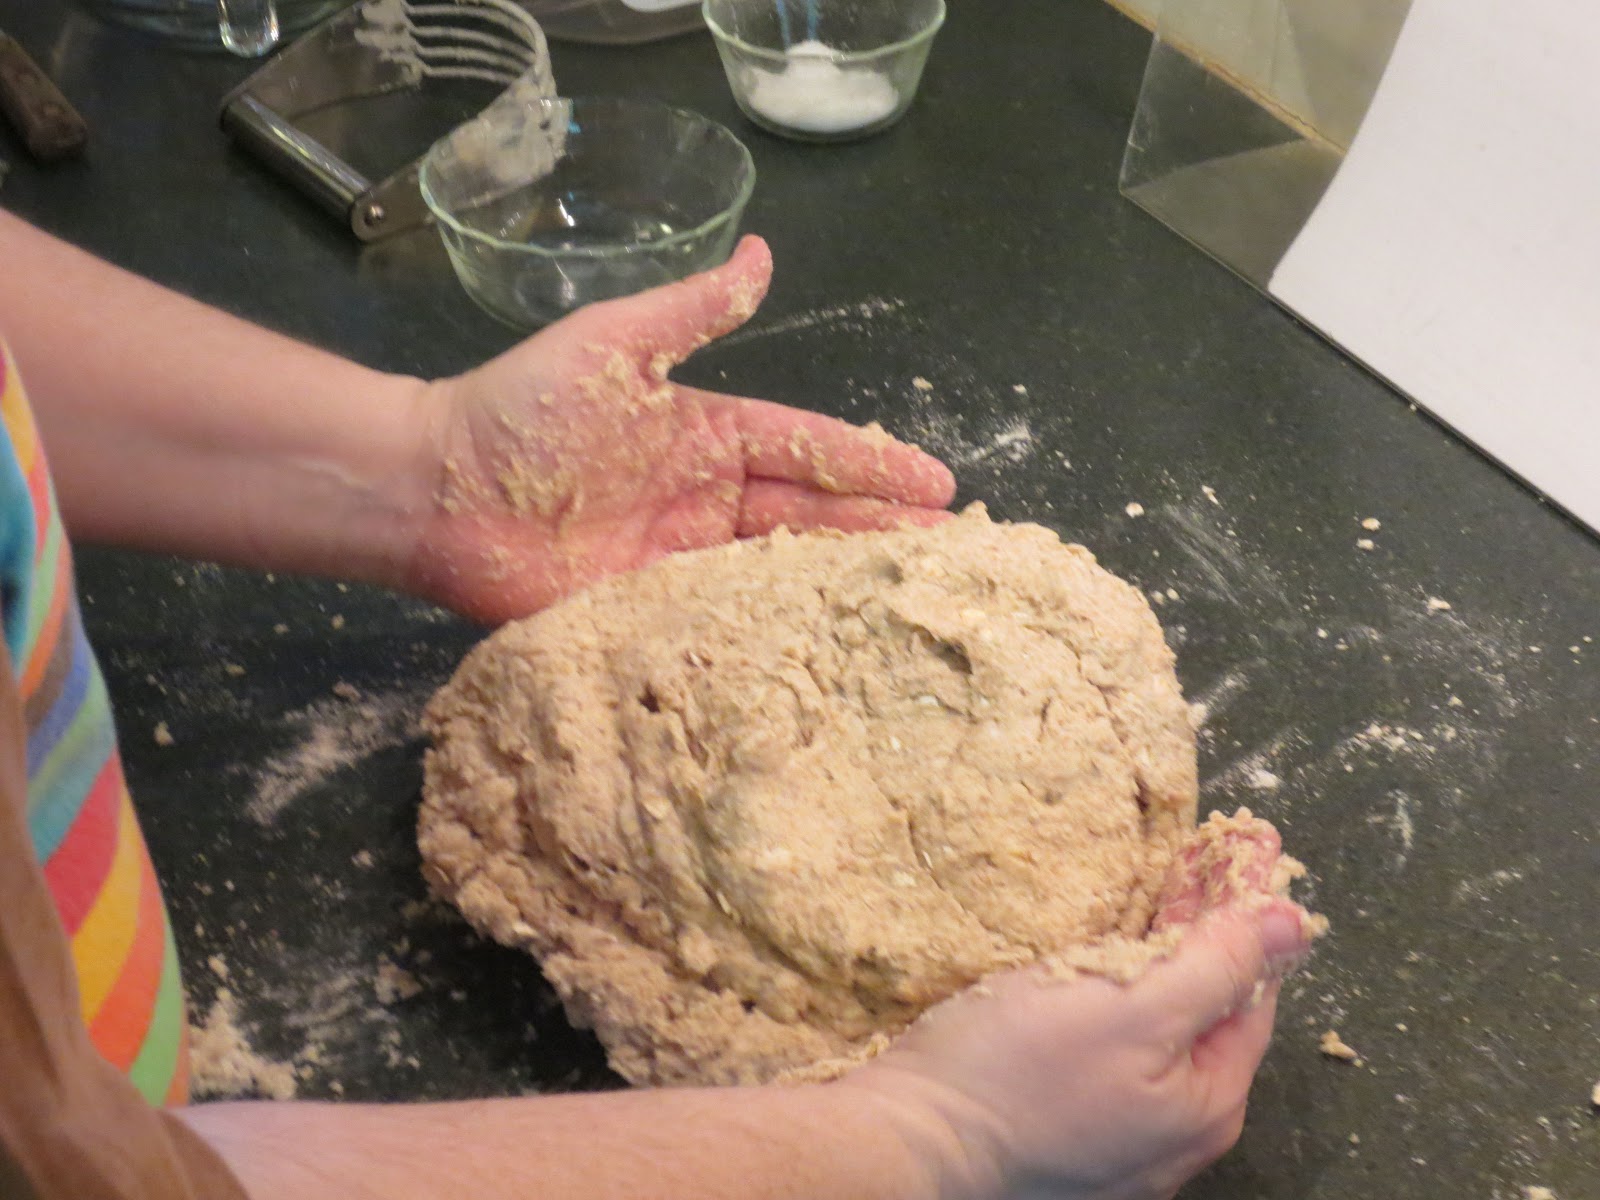 |
| I kneaded the dough until it came together. You don't need to knead for 10 minutes because this is a quick bread, not a yeast dough. Husband took picture (thanks!). |

 |
| Daughter helps brush on the buttermilk. |
 |
| Ready for the oven! The baking tin in the original recipe is an American cookie sheet. I put the cross on the loaves because that's what soda bread recipes usually say to do. |
There's no baking time listed, but I found that 45 minutes at 425 F worked well for making four loaves. If you only made two, I would imagine you'd be looking at about an hour, and if you made six loaves, as written, it might be more like 35 or 40. Yum! Thanks, Tony!
 |
| The finished loaves. |
Sunday, May 27, 2012
Grilled Steelhead Trout, Sautéed Green Beans and Too Much Ketchup
Memorial Day weekend. We're going to a dinner/picnic tomorrow with my husband's colleagues, so I had to get my grilling in yesterday and today. Yesterday I made ribs but son had the camera while conducting some lengthy experiment with stop-action photography and Legos, so I didn't document it. Some other time! Today was my weekly trip to the grocery store, where I found that between last weekend and this weekend they had rearranged about 70% of the items in the store. Can I just take a moment to say that this periodical rearrangement of the merchandise kind of sucks? I finally get to know where everything I need happens to be, then they change it all. *sigh*
Anyway, when I shop on Sundays there's usually one particular employee I look for behind the meat and fish counter. He's not a butcher, but he is the guy who orders the fish. I suppose that would make him a fishmonger, but I'm not sure he's that much of an expert. Anyway, he knows me well enough to tell me what's fresh and what is maybe not such a great idea. I was looking at some cod, thinking I might do some fish and chips, but he saw me and shook his head. The freshest thing he had were sides of Steelhead Trout. Since fish is insanely expensive in Oklahoma (with the possible exception of catfish, but who really wants to eat a bottom feeder so primitive it doesn't really have scales?), I swallowed hard and bought a $30 side, with skin on. I figured I could get two meals out of it. It was beautiful though--here it is all cut up and ready to grill:

After surfing around for a recipe, I found this one here, from a site called Home Ec 101. The site recommends baking the trout in foil with the marinade, but I opted to grill. The marinade/sauce did look tasty though, so I decided to use it.
Honey Garlic Glaze
1/4 C butter, melted
2 garlic cloves, minced
2 Tbsp. honey
2 Tbsp. brown sugar
2 Tbsp. Dijon mustard
2 Tbsp. soy sauce
2 Tbsp. rice wine vinegar
Whisk all the ingredients into the melted butter. Voilà, you've got a glaze.
So, I fire up the grill. We've got a propane grill. Yes, I know charcoal or wood grills make the food taste better, but a propane grill is so convenient that I can use it several times a week in the summer without dealing with building fires or dealing with charcoal ashes. So there. Now, there's a trick or two to grilling fish. Ever tried to grill fish and end up with a shredded mess when you try to turn the fish over and half of it sticks to the grill? Raise your hand if it's ever happened to you. Come on, be honest. ...I thought so. It finally dawned on me after watching cooking shows, primarily Alton Brown's Good Eats, that there's a right way and a wrong way. Right way--it helps if you use a relatively oily fish that's not insanely delicate. Tuna, salmon, swordfish, some trouts, etc. work pretty well. Get the grill good and hot by preheating it for a while. Scrub down the grill, and rub with oil. Then put your fish, skin side up, on the grill.

Now resist the urge to start poking at it and seeing if it sticks. If you try to turn them right away, they likely will stick at this point. Let them cook a good four or five minutes at least (a bit more wouldn't hurt), because then the fish touching the grill will cook enough to release more easily. I also close the lid while I'm waiting to help them cook a bit, as these were pretty thick pieces of fish. Ok, *now* turn them over and brush them with glaze.

See those lovely grill marks? Now you can continue to cook the fish and it doesn't matter if you get the skin charred. The skin will also release pretty easily from the grill once you get it cooked a bit. How long do you cook the fish? It depends entirely upon the kind of fish and how thick it is. For these pieces, which were about 1 1/2" thick, the total cooking time was probably about 18 minutes over a hot but not infernal fire. I like my fish just cooked--in other words cooked more or less all the way through, but not dry. The inside of mine was still a bit rosy and moist, rather than pale pink and dry. The more you keep the grill closed the less time you will need, but I left it open a fair amount for the last five minutes while I kept basting with the glaze.
Once you're done, you end up with something that looks like this:

Are you going to want a side dish with that? I am probably the world's least imaginative person with vegetables. I blame the distinct lack of fresh vegetables in my life while growing up (see previous post "How I learned to cook"). It's easier than blaming myself. Anyway, rather than just steaming some green beans, I decided to get very marginally creative. There were some lovely locally grown organic spring onions at the local foods market (Native Roots Market--a very cool place) and some decent looking beans at the local grocery store. The spring onions basically looked like overgrown green onions--with the white part beginning to make a bulb. I sliced up one of the larger spring onions, prepared the green beans, then threw it all in a pan with some butter, about one tablespoon or so.
 |
| See that lovely cropping I did? That's to avoid showing you how much my stovetop needs cleaning. |
I sautéed the whole thing until the onions were beginning to brown and the beans were crisp/tender. Tossed a bit of salt into it and stirred it in. The final product looked something like this:

Nothing to write home about, but it was better than steamed.
Now the last bit of today's blog is at the request of my children. Since they have been seeing me taking pictures of food for the last month, they each insisted that I take a picture of their plates. Daughter went first:

Notice the large dollop of ketchup to your left. She has learned to do this by imitating her brother. Speaking of her brother, here's his plate:

See that pile of red goo on his plate? That's where he mashed up the trout and mixed the whole thing with ketchup. Do you see what I have to put up with??
Friday, May 25, 2012
Tour de Jello
In my recent post about one of the worst cookbooks I own, I posted a recipe for "Zingy Tomato Salad" which involved, among other things cherry jello and tomatoes. This prompted a somewhat lengthy discussion on Facebook about odd jello recipes, and the advisability (or not) of putting vegetables in jello. Tonight, for the heck of it, I cruised through a bunch of vintage food ads at Vintage Ad Browser. I can find jello ads all the way back the early 1900s. Most of the ones I saw up until the 1940s or so were plain flavored gelatin, sometimes with a dollop of mayonnaise or fruit *on* the jello. A lot like this...
 Although I know from reading culinary history books, in this case especially Fashionable Food: Seven Decades of Food Fads by Sylvia Lovegren (2005, University of Chicago Press), that jello with stuff in it existed before the 1940s, the ads with complex jello recipes begin appearing in earnest in the 1940s.

We've got both vegetable and fruit jello salads in that one.
Long about the 1950s, the jello ads, or more properly Jell-O ads are everywhere. Here's a lovely fruit version:
 And how about some vegetables?
 Maybe some nuts?

In order to avoid getting bored with throwing chopped stuff into the jello salads, how about using jello with ice cream?

Bet you didn't know there was a national "You-Can-Do-The-Jolliest-Things-with-Jell-O-And-Ice-Cream week! Hey, when is that coming around this year anyway?
By the time I got to the 1960s, the jello recipes had slowed down quite a bit. Miracle Whip salad dressing was now *in* the gelatin, rather than on top of the gelatin.

But I think I put together this whole tour de jello just to show you this last ad. 1960s. Convenience foods. Beginning of women's lib. Who has time to put together some fancy jello salad anymore? Here's the ultimate in Jell-O with fruit in it for the on-the-go cook:
 Just dump out the pineapple juice, dump in the lime gelatin, and voilà--pineapple lime jello salad!
I thought this was the ultimate in lazy jello salads, but I just recalled that pre-made jello singles, some with fruit in them, are now available in stores. No boiling of water required. It's all downhill from here.


We've got both vegetable and fruit jello salads in that one.
Long about the 1950s, the jello ads, or more properly Jell-O ads are everywhere. Here's a lovely fruit version:


In order to avoid getting bored with throwing chopped stuff into the jello salads, how about using jello with ice cream?

Bet you didn't know there was a national "You-Can-Do-The-Jolliest-Things-with-Jell-O-And-Ice-Cream week! Hey, when is that coming around this year anyway?
By the time I got to the 1960s, the jello recipes had slowed down quite a bit. Miracle Whip salad dressing was now *in* the gelatin, rather than on top of the gelatin.


I thought this was the ultimate in lazy jello salads, but I just recalled that pre-made jello singles, some with fruit in them, are now available in stores. No boiling of water required. It's all downhill from here.
Wednesday, May 23, 2012
Cooking My Bookshelves: Chicken Risotto à la Milanese
After a lovely few days with my sister, today was the first day back to normal mealtime. In keeping with my approximately-whenever-I-feel-like-it theme of cooking a recipe or two from every cookbook I own, I chose a book called Cook's Library: One Pot. It's a book printed in China and published in 2002 by Parragon Publishing out of Bath, England. The measurements in the book are given in both metric and American units, so I assume that it is intended for English speaking audiences in general. I can't even remember where I bought it. I tend to pick up odd cookbooks here and there at Sam's Club or discount book stores. I've used the book several times for a Jambalaya recipe and have tried a few others. The dishes tend to be fairly mild, and taste OK, but aren't anything to get all excited about. Still, there it was so I grabbed it, determined to try something new for dinner.

After some perusal (and a quick check for what I had in the pantry), I settled on a recipe entitled "Chicken Risotto à la Milanese." I've made risotto probably about a dozen times. I'm no expert, but the directions were a bit odd. Here's the recipe as written:
1/2 cup butter
2 lb/900 g skinless boneless chicken, sliced thinly
1 large onion, chopped
1 lb/450 g risotto rice
2 1/2 cups chicken bouillon
2/3 cup white wine
1 tsp crumbled saffron
salt and pepper
2/3 cup grated parmesan cheese, to serve
1. Heat 4 tablespoons of the butter in a deep skillet and cook the chicken and onion until golden brown.
2. Add the rice, stir well, and cook over low heat for 15 minutes.
3. Heat bouillon until boiling and gradually add to the rice. Add the white wine, saffron, salt and pepper to taste, and mix well. Simmer gently for 20 minutes, stirring occasionally, and adding more bouillon if necessary.
4. Set aside for 2-3 minutes and just before serving, add a little more bouillon and simmer for 10 minutes. Serve the risotto sprinkled with the grated Parmesan cheese and the remaining butter.
I don't know about you, but if you've made risotto before you generally heat the broth, add gradually to the rice, stirring regularly until each addition of broth is almost absorbed before you add more. The risotto is done when the grains are fully cooked but still firm, and you have a lovely creamy fairly thick (but not the consistency of paste!) sauce. The method outlined in the recipe may work, but it seemed to me like you wouldn't get the creamy texture of the rice and sauce. So, not trusting the recipe, what I did looks something like this:
5 T butter
1 lb boneless, skinless chicken
1 large sweet onion (I used Vidalia), chopped
1 lb Arborio rice (Arborio is one of the varieties of short-grain rice typically used for risotto)
5-ish cups chicken broth, heated to a simmer
1-ish cup hot water
2/3 cup white wine (I used Chardonnay)
1/2 teaspoon saffron (because saffron's to damn expensive to use a whole teaspoon)
1/2 teaspoon salt
1/4 teaspoon fresh ground black pepper
1/4 cup freshly grated parmesan cheese (because I'm the only one who likes it)
First, I prepped the ingredients. I grated the parmesan...
Measured out the rice...
Crumble the saffron, muttering to myself about how friggin' expensive it is...
Chopped the chicken and onions. Then I melted the butter in a large skillet, and sautéed the chicken and onions until light brown. I then added the rice and sautéed for about five minutes. Meanwhile, I had the chicken broth in a pot on another burner and brought it to a simmer. I added about a cup initially, which was absorbed quickly. I then added the wine, saffron, salt and pepper and stirred that in before adding the next installment of chicken broth. Each time I added more broth, I added about 1/2 cup, and stirred pretty constantly until it was almost absorbed and added more. You may have noticed that I used about twice as much liquid as the original recipe called for. Maybe it was my cooking method, maybe the original recipe was poorly written, but my rice was still crunchy after 2 1/2 cups of broth. My rice was also on the older side, and so may have required more liquid.
Really, it's difficult to give an exact amount of broth you will need. You just keep adding until the rice is cooked through, but still somewhat firm. It will absorb quickly at first, and will slow towards the end. You'll have to taste several times towards the end. I also thought, after about 4 1/2 or 5 cups of broth that the risotto was getting a little salty, so for the last cup or so of liquid I added just hot water. Once it was done (it took about 30 minutes of adding in liquid at medium -high heat until it was done), I served it immediately with a bit of Parmesan.

The taste and texture I though were quite good, however I don't claim to be a risotto expert of any kind! The lovely yellow color comes from the saffron. My husband liked it. Son didn't like the texture of the rice, although he liked the flavor (it was a new texture for him, and he's a big texture guy). Daughter ate some, but claimed she didn't like onion. Moral of this story: risotto is yummy, but it's a fair amount of time at the stove. Save it for people who will appreciate it.

After some perusal (and a quick check for what I had in the pantry), I settled on a recipe entitled "Chicken Risotto à la Milanese." I've made risotto probably about a dozen times. I'm no expert, but the directions were a bit odd. Here's the recipe as written:
1/2 cup butter
2 lb/900 g skinless boneless chicken, sliced thinly
1 large onion, chopped
1 lb/450 g risotto rice
2 1/2 cups chicken bouillon
2/3 cup white wine
1 tsp crumbled saffron
salt and pepper
2/3 cup grated parmesan cheese, to serve
1. Heat 4 tablespoons of the butter in a deep skillet and cook the chicken and onion until golden brown.
2. Add the rice, stir well, and cook over low heat for 15 minutes.
3. Heat bouillon until boiling and gradually add to the rice. Add the white wine, saffron, salt and pepper to taste, and mix well. Simmer gently for 20 minutes, stirring occasionally, and adding more bouillon if necessary.
4. Set aside for 2-3 minutes and just before serving, add a little more bouillon and simmer for 10 minutes. Serve the risotto sprinkled with the grated Parmesan cheese and the remaining butter.
I don't know about you, but if you've made risotto before you generally heat the broth, add gradually to the rice, stirring regularly until each addition of broth is almost absorbed before you add more. The risotto is done when the grains are fully cooked but still firm, and you have a lovely creamy fairly thick (but not the consistency of paste!) sauce. The method outlined in the recipe may work, but it seemed to me like you wouldn't get the creamy texture of the rice and sauce. So, not trusting the recipe, what I did looks something like this:
5 T butter
1 lb boneless, skinless chicken
1 large sweet onion (I used Vidalia), chopped
1 lb Arborio rice (Arborio is one of the varieties of short-grain rice typically used for risotto)
5-ish cups chicken broth, heated to a simmer
1-ish cup hot water
2/3 cup white wine (I used Chardonnay)
1/2 teaspoon saffron (because saffron's to damn expensive to use a whole teaspoon)
1/2 teaspoon salt
1/4 teaspoon fresh ground black pepper
1/4 cup freshly grated parmesan cheese (because I'm the only one who likes it)
First, I prepped the ingredients. I grated the parmesan...
 |
| I usually use a microplane grater, but opted for the larger holes of a box grater here |
 |
| Get a digital kitchen scale. Very, very handy for baking and metric recipes. |
 |
| See the saffron? No? That's because $15 only buys you about .03 oz in a teeny little plastic bag, stuffed inside a large bottle. Feh. |
 |
| Just after the addition of more liquid. |

The taste and texture I though were quite good, however I don't claim to be a risotto expert of any kind! The lovely yellow color comes from the saffron. My husband liked it. Son didn't like the texture of the rice, although he liked the flavor (it was a new texture for him, and he's a big texture guy). Daughter ate some, but claimed she didn't like onion. Moral of this story: risotto is yummy, but it's a fair amount of time at the stove. Save it for people who will appreciate it.
Saturday, May 19, 2012
Cooking Through my Bookshelves
There's a type of food blog commonly referred to as the "cook-through" blog. What this means is that the blogger chooses a cookbook and cooks every recipe in the book over a (usually fairly lengthy) period of time. The most famous of these blogs was known as "Julie and Julia." I actually started reading it while it was in progress. The blogger, Julie Powell, decided to cook Julia Child's entire Mastering the Art of French Cooking in 365 days. She edited the blog into a book called Julie and Julia, which was eventually made into a decent movie as much about the life of Julia Child as it was about Julie Powell. You can read more about Julie Powell's work here. While Julie may be the most famous "cook-through" blogger, she's not the only one out there. "Cook-through" bloggers tend to choose a famous, difficult, or iconic cookbooks for their blog.
As I am someone who doesn't really have the time or inclination to cook through an entire series of sometimes difficult, sometimes costly recipes, I figure this type of blog isn't for me. I do, however, have a large bookcase full of cookbooks. I've cooked recipes from most of these cookbooks, but not all. In my own twist on the "cook-through" blogging concept, I have decided to cook a recipe or two from each and every cookbook I own and blog about the results. I will post these entries approximately whenever I feel like it, and will finish whenever I stop buying cookbooks (which will probably be when I have a toe-tag on in some morgue). They will not be my only posts.
I'm not going to go in any particular order. To begin, I grabbed a small booklet which I purchased for historical interest, entitled 250 Superb Pies and Pastries. It was published in 1952 by Consolidated Book Publishers in Chicago, IL. It was edited by one Ruth Berolzheimer who was at the time the director of something called the Culinary Arts Institute. There's an interesting article about Ms. Berolzheimer and the Culinary Arts institute which you can find here. Here's an interesting quote from the article for you, though:
""I thought she was kind of a lousy cook, to tell the truth," says Henry, who sometimes had breakfast at his aunt's Hyde Park apartment. Her nephews believe their aunt's talents mostly lay in organization and publishing."
Apparently she was a better cookbook editor than actual cook.

I decided to try a recipe for a pie which I have never made, and which sounded old-fashioned. Ok, I didn't go for the Grapefruit Pie, Prune Pie or Shartlesville Pumpkin Pie (made with an entire cup of whiskey), because I wanted something we might actually eat. Although come to think of it, I might try the Shartlesville Pumpkin Pie at some point, when the children aren't around. I opted for Butterscotch Pie.
To make Butterscotch Pie, you actually have to follow three different recipes in three different places in the cookbook. Since the pie recipe requires a baked pie shell, I started with that. Although it nearly killed me, I was determined to follow the recipes as written. I normally make my pie crusts with at least half butter, because I like the taste. This recipe used shortening only:
Plain Pastry
2 cups flour, sifted
3/4 tsp salt
2/3 cup shortening
4 to 6 tablespoons cold water.
Sift flour and salt together and cut in shortening with 2 knives or pastry blender.
Add water, using only a small portion at a time, until mixture will hold together. I used ice water here, which is pretty standard in most recipes. Divide dough into 2 parts. Ok, now here's something strange. Nowhere in the recipe did it say to chill the dough. After I finished baking the pie, I read the general introduction to the cookbook, and they did say to chill the dough, but didn't say for how long. So I didn't chill the dough, although I had used chilled shortening and ice water making the dough. It seemed to turn out fine.
Roll 1/2 of the dough 1/8 inch thick, fold in half then lift into pie pan. Do not stretch dough.
You might note here that I roll my dough out on plastic wrap. This cookbook wants you to roll dough on a floured board. I learned how to roll dough that way, but I really like this better. Here's why:
After crust is fitted, trim edges evening, leaving a 1-inch overhanging border, fold dough under and back to make and upright rim, then flute edges using thumb and index finger of one hand and the index finger of the other hand. Prick crust thoroughly with a fork...
 ...then use one of the following methods to prevent shrinkage of crust: Place rolled dough in pan and set aside for 5 minutes, then find into place with a ball of dough. (I have no idea what that means.) OR Line pastry shell with waxed paper and partially fill with rice or beans, remove paper after first 10 minutes of baking. OR Fit a second pan inside on crust, remove pan after first 10 minutes. That's the method I chose. Bake in a very hot oven (450 F) about 15 minutes or until delicately browned.
Ok, now onto the Butterscotch Pie recipe.
Butterscotch Pie
3/4 cup brown sugar
1/4 cup granulated sugar
1/3 cup flour
2 cups scalded milk
1/8 teaspoon salt
3 egg yolks, beaten
1 1/2 tablespoons butter
1 teaspoon vanilla
1 baked Pastry Shell
1 recipe Meringue II
Combine sugars with flour, add hot milk gradually, stirring constantly to make a smooth mixture. Add salt and cook in top of double boiler for 15 minutes, stirring occasionally, until thickened.
Pour part of the hot mixture slowly onto egg yolks, stirring constantly. Pour back into double boiler, and cook not more than three minutes, stirring almost constantly. Add butter, stir until melted. Cool. (I put the bowl in an ice bath and stirred for several minutes to speed up the cooling.) Add vanilla, pour into pastry shell...
 ...cover with meringue and proceed as directed.
Ok, so now we have to go look at the Meringue II Recipe.
Meringue II
3 egg whites
6 tablespoons sugar
1/2 tsp vanilla
Beat eggs until frothy. Add sugar gradually...
 ...and continue beating until stiff.
 Add flavoring. Pile on pie and bake in a slow oven (325 F) 15 to 18 minutes.
And here's the finished product, after 17 minutes in the oven:
 And then, here's the slice. I waited about 15 minutes before slicing the pie. Apparently that wasn't enough. The recipe didn't say to chill it first, but I suspect the filling wouldn't have been quite so runny if I had. There also seemed to be some clear liquid in the bottom of the pie plate--something separated, but I'm not entirely sure what.
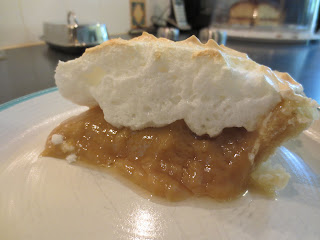 How did it taste? My first reaction was, "Holy cow, that's awfully sweet." The filling was sweeter than I had expected, and with 6 tablespoons of sugar, the meringue was plenty sweet as well. The pie crust wasn't buttery, but it was tender and flaky. Would I make it again? Probably not, but it was good experience. Maybe they liked their pies a bit sweeter in 1952!
As I am someone who doesn't really have the time or inclination to cook through an entire series of sometimes difficult, sometimes costly recipes, I figure this type of blog isn't for me. I do, however, have a large bookcase full of cookbooks. I've cooked recipes from most of these cookbooks, but not all. In my own twist on the "cook-through" blogging concept, I have decided to cook a recipe or two from each and every cookbook I own and blog about the results. I will post these entries approximately whenever I feel like it, and will finish whenever I stop buying cookbooks (which will probably be when I have a toe-tag on in some morgue). They will not be my only posts.
I'm not going to go in any particular order. To begin, I grabbed a small booklet which I purchased for historical interest, entitled 250 Superb Pies and Pastries. It was published in 1952 by Consolidated Book Publishers in Chicago, IL. It was edited by one Ruth Berolzheimer who was at the time the director of something called the Culinary Arts Institute. There's an interesting article about Ms. Berolzheimer and the Culinary Arts institute which you can find here. Here's an interesting quote from the article for you, though:
""I thought she was kind of a lousy cook, to tell the truth," says Henry, who sometimes had breakfast at his aunt's Hyde Park apartment. Her nephews believe their aunt's talents mostly lay in organization and publishing."
Apparently she was a better cookbook editor than actual cook.

I decided to try a recipe for a pie which I have never made, and which sounded old-fashioned. Ok, I didn't go for the Grapefruit Pie, Prune Pie or Shartlesville Pumpkin Pie (made with an entire cup of whiskey), because I wanted something we might actually eat. Although come to think of it, I might try the Shartlesville Pumpkin Pie at some point, when the children aren't around. I opted for Butterscotch Pie.
To make Butterscotch Pie, you actually have to follow three different recipes in three different places in the cookbook. Since the pie recipe requires a baked pie shell, I started with that. Although it nearly killed me, I was determined to follow the recipes as written. I normally make my pie crusts with at least half butter, because I like the taste. This recipe used shortening only:
Plain Pastry
2 cups flour, sifted
3/4 tsp salt
2/3 cup shortening
4 to 6 tablespoons cold water.
Sift flour and salt together and cut in shortening with 2 knives or pastry blender.
 |
| I like this kind of pastry cutter. The ones with just wires suck. |
 |
| I end up with something that looks like this. I actually enjoy doing this part. |
 |
| You will note here that I have cheated and will be rolling out the portion on the left, which is more than half. |
 |
| You know how cookbooks and cooking shows have the cook rolling out perfect circles of dough? I have no idea how they do that. |
| You can pick up the plastic wrap, turn it upside down, and just slap that puppy right into the pie pan. |

 |
| Maybe could have used a bit more browning, but this is after 15 minutes. |
Butterscotch Pie
3/4 cup brown sugar
1/4 cup granulated sugar
1/3 cup flour
2 cups scalded milk
1/8 teaspoon salt
3 egg yolks, beaten
1 1/2 tablespoons butter
1 teaspoon vanilla
1 baked Pastry Shell
1 recipe Meringue II
Combine sugars with flour, add hot milk gradually, stirring constantly to make a smooth mixture. Add salt and cook in top of double boiler for 15 minutes, stirring occasionally, until thickened.
 |
| Don't own a double boiler, but a metal bowl over simmering water works just fine. |

Ok, so now we have to go look at the Meringue II Recipe.
Meringue II
3 egg whites
6 tablespoons sugar
1/2 tsp vanilla
Beat eggs until frothy. Add sugar gradually...


 |
| I've never actually baked a pie with meringue on it before. I've read that the meringue needs to go all the way to the crust to seal in the filling. That's what I did. |


Wednesday, May 16, 2012
Cruising the Food Blogs: Peanut Sesame Noodles
This afternoon I made a trip to one of my favorite food stores: Super Cao Nguyen in Oklahoma City. A business which originally started as a much smaller Vietnamese grocery store, Super Cao has grown into a huge store with items from all over the world. It's always a humbling experience. Why? Most times I feel fairly confident that I have a good basic grasp of many of the major cuisines of the world. Then I go to Super Cao and I look at about 70% of the stuff and think, "What the hell???" Buying food there is particularly adventurous when many of the labels for the Asian ingredients have only the most cursory details in English. Fried food starch, what's that? Coconut--is that coconut milk, flaked coconut, coconut oil? And what the heck is "Tokyo flavor" ramen? Chicken? Fish? Pork? Squid? If nothing else, it certainly provides for a diverting hour or two of reading labels. They have lots of fresh vegetables and fruits, some of which I don't recognize even though I have been to this store many times.
When Super Cao was in the much smaller location, the clientele seemed primarily Asian. Now it's a mix of Hispanic, Asian, Indian, Middle Eastern, and plain old Caucasian. I notice that they now hire employees from all these different ethnic groups, perhaps so there are employees who are familiar with the diverse cuisines. In any case, it's always an adventure.
Today I was primarily on a noodle run. My kids and I love rice cakes--not the kind that are puffy and crunchy. These are rice cakes which are used in Korean and sometimes Chinese cuisine--flat oblong disks probably made mostly of rice flour and water. When cooked in a stir-fry or a soup, they turn into wonderful chewy treasures which take on the flavor of the dish they are in. I also picked up some udon and other assorted noodles, including some precooked Chinese egg noodles. Since decent rice is ridiculously expensive at my usual grocery store, I got good rice (Jasmine and Calrose) as well. And what the heck, some curry, naan, ramen, gochujang (a spicy Korean chili paste), and fresh vegetables.
So, after that trip, tonight I decided to make Peanut Sesame Noodles. There are many recipes out there, but I started with this one from one of my favorite food blogs, Smitten Kitchen. I swear, everything Deb Perelman makes looks absolutely delicious. Her recipe was adapted from one which appeared in Gourmet magazine in June, 2002. You can find it here. What you're getting here is my adaptation of the recipe that appears at Smitten Kitchen.
To begin, I made the peanut dressing by sticking pretty closely to the recipe:
1/2 C smooth peanut butter
1/4 C soy sauce
1/3 C warm water
1 T chopped fresh ginger (peel it first)
3 small garlic cloves (Smitten Kitchen calls for 1 medium, but I like garlic)
2 T rice vinegar
1 1/2 T sesame oil
1 T honey
a dash of red pepper flakes (Smitten Kitchen calls for 1 T, which would have been great but then my kids wouldn't have eaten it...)

Buzz the whole thing up in a blender for about two minutes.
Next, I chopped up some veggies and tofu. I ended up with roughly:
4 green onions, thinly sliced
6 baby carrots, sliced into thin rounds
1 small cucumber, peeled and cut into chunks
about 1 1/2 cups sliced tofu--I like to use a puffy fried tofu that I get at Super Cao

The recipe at Smitten Kitchen calls for 1 red pepper and 1 yellow pepper, thinly sliced, regular extra-firm tofu, and sesame seeds, but 1) the kids won't eat peppers, 2) I like the fried puffy tofu and 3) I totally forgot to buy more sesame seeds. Oops.
Now for the noodles. I intended to buy uncooked Chinese egg noodles. What I ended up buying was precooked Chinese egg noodles. Which just goes to show is that, even when you are carefully reading ingredients it is possible to not notice the big statement on the package that says you are buying cooked noodles. *sigh*
Anyway, I rinsed my precooked noodles in some cold water. I used about a package and a half, which is about 1 1/2 pounds. The original recipe called for 3/4 pound dried soba. The texture of the precooked noodles was a little spongy, but edible. Cooking my own would have been better.
Finally, put the noodles in the bowl with the other stuff, pour over the peanut sesame dressing and toss everything together. You'll get something that looks like this:

It would be more colorful with peppers. It turned out pretty tasty, though. Daughter ate a fair bit. Son turned up his nose because no ketchup was involved. Husband liked it.
Post script: Why am I holding the bowl in the above picture? Because by the time I finished my kitchen counter was so messy I would have had to clean it up before being able to take a picture of the bowl. And who wants to clean off the counter when you're starving?
When Super Cao was in the much smaller location, the clientele seemed primarily Asian. Now it's a mix of Hispanic, Asian, Indian, Middle Eastern, and plain old Caucasian. I notice that they now hire employees from all these different ethnic groups, perhaps so there are employees who are familiar with the diverse cuisines. In any case, it's always an adventure.
Today I was primarily on a noodle run. My kids and I love rice cakes--not the kind that are puffy and crunchy. These are rice cakes which are used in Korean and sometimes Chinese cuisine--flat oblong disks probably made mostly of rice flour and water. When cooked in a stir-fry or a soup, they turn into wonderful chewy treasures which take on the flavor of the dish they are in. I also picked up some udon and other assorted noodles, including some precooked Chinese egg noodles. Since decent rice is ridiculously expensive at my usual grocery store, I got good rice (Jasmine and Calrose) as well. And what the heck, some curry, naan, ramen, gochujang (a spicy Korean chili paste), and fresh vegetables.
So, after that trip, tonight I decided to make Peanut Sesame Noodles. There are many recipes out there, but I started with this one from one of my favorite food blogs, Smitten Kitchen. I swear, everything Deb Perelman makes looks absolutely delicious. Her recipe was adapted from one which appeared in Gourmet magazine in June, 2002. You can find it here. What you're getting here is my adaptation of the recipe that appears at Smitten Kitchen.
To begin, I made the peanut dressing by sticking pretty closely to the recipe:
1/2 C smooth peanut butter
1/4 C soy sauce
1/3 C warm water
1 T chopped fresh ginger (peel it first)
3 small garlic cloves (Smitten Kitchen calls for 1 medium, but I like garlic)
2 T rice vinegar
1 1/2 T sesame oil
1 T honey
a dash of red pepper flakes (Smitten Kitchen calls for 1 T, which would have been great but then my kids wouldn't have eaten it...)

Buzz the whole thing up in a blender for about two minutes.
Next, I chopped up some veggies and tofu. I ended up with roughly:
4 green onions, thinly sliced
6 baby carrots, sliced into thin rounds
1 small cucumber, peeled and cut into chunks
about 1 1/2 cups sliced tofu--I like to use a puffy fried tofu that I get at Super Cao

The recipe at Smitten Kitchen calls for 1 red pepper and 1 yellow pepper, thinly sliced, regular extra-firm tofu, and sesame seeds, but 1) the kids won't eat peppers, 2) I like the fried puffy tofu and 3) I totally forgot to buy more sesame seeds. Oops.
Now for the noodles. I intended to buy uncooked Chinese egg noodles. What I ended up buying was precooked Chinese egg noodles. Which just goes to show is that, even when you are carefully reading ingredients it is possible to not notice the big statement on the package that says you are buying cooked noodles. *sigh*
 |
| See that nice red line with the words "Cooked Noodle" on it? Yeah. |
Anyway, I rinsed my precooked noodles in some cold water. I used about a package and a half, which is about 1 1/2 pounds. The original recipe called for 3/4 pound dried soba. The texture of the precooked noodles was a little spongy, but edible. Cooking my own would have been better.
Finally, put the noodles in the bowl with the other stuff, pour over the peanut sesame dressing and toss everything together. You'll get something that looks like this:

It would be more colorful with peppers. It turned out pretty tasty, though. Daughter ate a fair bit. Son turned up his nose because no ketchup was involved. Husband liked it.
Post script: Why am I holding the bowl in the above picture? Because by the time I finished my kitchen counter was so messy I would have had to clean it up before being able to take a picture of the bowl. And who wants to clean off the counter when you're starving?
Subscribe to:
Posts (Atom)